Post-Processing FDM Prints: Sanding, Polishing, and Painting
Standard FDM parts show layer lines. Sanding, priming, painting, or chemical vapor-smoothing can transform raw 3D prints into premium, retail-ready components.
Achieving an Injection-Moulded Surface Quality
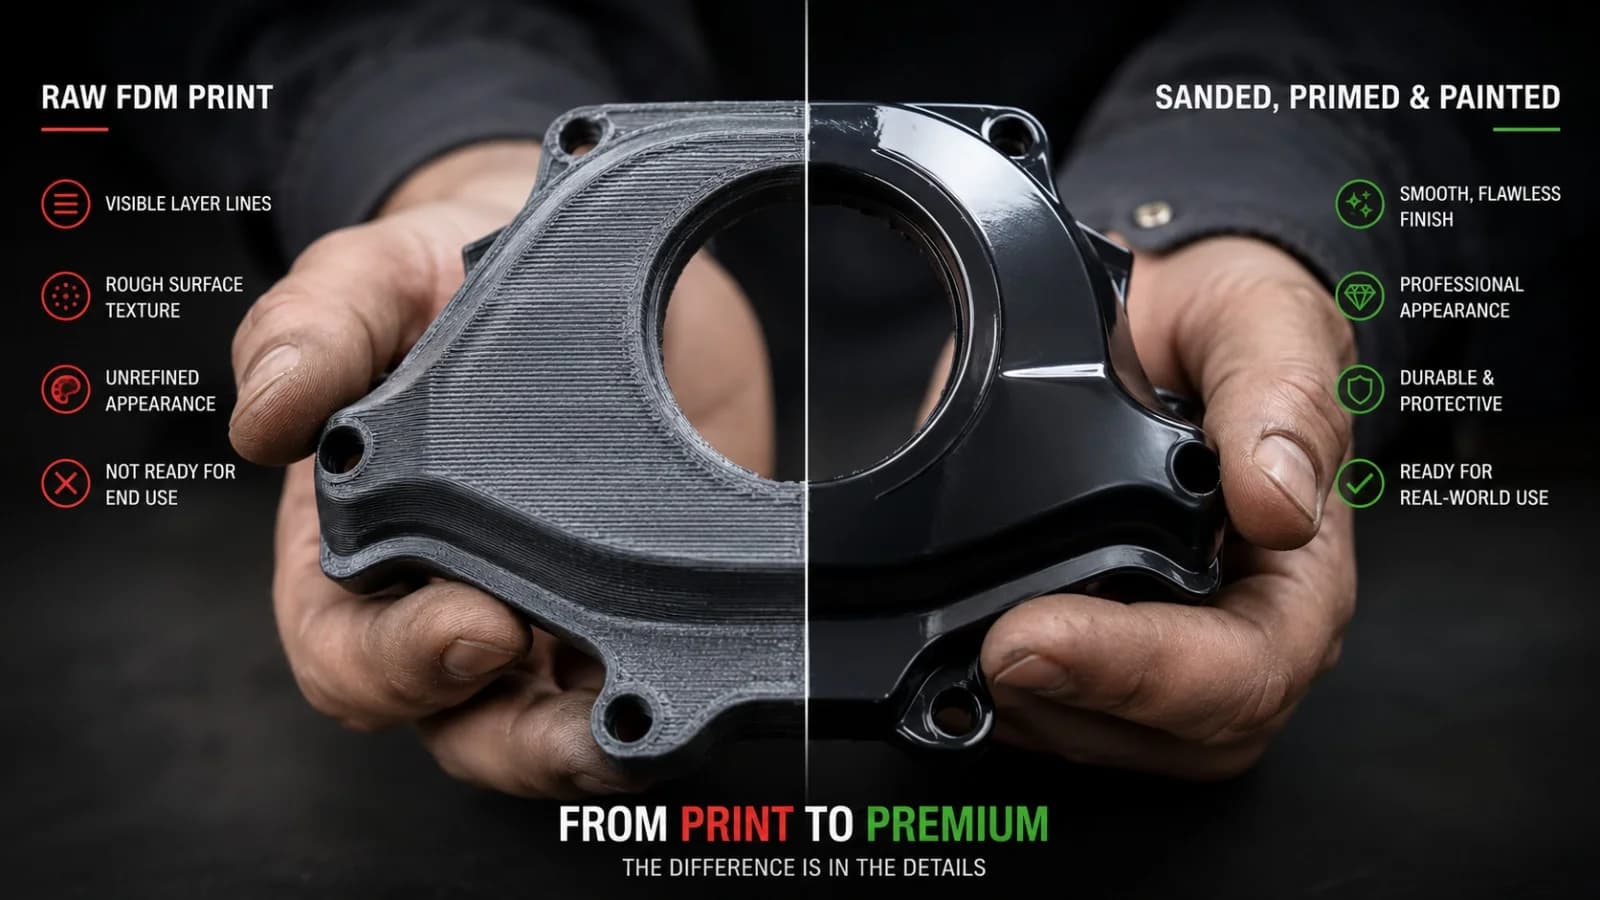
Fused Deposition Modelling (FDM) 3D printing is a highly efficient manufacturing process, but it has a distinct cosmetic trade-off: visible layer lines. While these lines are acceptable for functional engineering prototypes, consumer products and display models require a smooth, high-quality surface.
With the right post-processing techniques, we can transform raw FDM prints into parts that are virtually indistinguishable from injection-moulded plastic.
Achieving a professional glossy finish on FDM prints requires systematic sanding, high-build priming, and professional painting.
Step-by-Step Post-Processing Guide
Here is the professional workflow we use at NovaLab 3D to finish display models:
- Primary Sanding (Dry): Start with a coarse grit sandpaper (120 or 180 grit) to remove print blobs, seam lines, and the worst of the layer lines. Use a backing block to ensure flat surfaces remain flat and do not round off.
- High-Build Primer Coating: Spray the part with a high-build automotive primer. This primer is designed to settle into the low valleys of the layer lines.
- Wet Sanding: Once the primer is fully cured, wet-sand the surface with a medium grit paper (320 or 400 grit). The water prevents the plastic dust from clogging the paper and provides a smoother finish.
- Second Prime & Sand (Optional): For perfect finishes, repeat the priming and sanding cycle with a fine 600 or 800 grit paper until the layer lines are completely filled.
- Color Coat and Clear Lacquer: Apply thin coats of color paint, followed by a protective clear coat (matte, satin, or gloss) to seal the paint and protect the surface.
Chemical Vapour Smoothing
For materials like ABS and ASA, we can bypass manual sanding by using chemical vapour smoothing.
We expose the printed part to a heated mist of acetone vapour for a few seconds. The acetone melts the outermost surface layer of the plastic, causing the layer lines to flow together. As the acetone evaporates, the surface solidifies into a glass-smooth, glossy finish. This process also welds the outer layers together, improving the part's waterproofing and impact resistance.
Request Finished Prototypes
NovaLab 3D offers professional post-processing and finishing services for exhibition models, consumer testing prototypes, and retail displays. Contact our Pickering facility to discuss your finish requirements.
Frequently Asked Questions
Keagan Walker
Founder & Lead Designer
NovaLab 3D is a boutique engineering and additive manufacturing studio based in Pickering, North Yorkshire. We provide B2B clients and product developers with direct access to lead engineering consulting, fast 48-hour turnarounds, and custom FDM production runs.